:focal(smart))

CUDA has a somewhat unusual split between the host machine and the development environment. The NVIDIA driver has to be installed on the host, but most of what we use while developing does not. The compiler, headers, runtime libraries, and tools such as cuDNN can all live inside the project environment.
Most CUDA installation guides start with the large toolkit installer from NVIDIA. That works, but it also means that every developer and every CI image needs a compatible toolkit. Switching compiler versions or reproducing an older build can then involve changing the system installation or starting again with a different container image.
The conda ecosystem already gives us another option. Conda-forge packages NVIDIA's CUDA toolkit artifacts as regular dependencies, and Pixi can install and lock those dependencies per project. We can use the same environment to develop the software and to build a conda package from it.
In this post I want to show how that works with a small CUDA program called cudabrot. It calculates the Mandelbrot set on the GPU and writes the result to the terminal. We will build it with CMake, run it through Pixi, and publish it as a .conda package. Then we will take the same idea and apply it to Python with CuPy.
I like this example because the program is small enough to understand in one sitting, but still uses the parts of CUDA that matter for packaging. We need a compiler, headers, a runtime library, GPU detection, and package metadata that keeps those pieces compatible. The complete code is in the companion repository.
Caution
pixi-build is a preview feature and may change until it is stabilized. You opt in by adding pixi-build to workspace.preview.
A quick look at CUDA packages
Before we start building, it helps to separate the toolkit from the driver. A system CUDA installer tends to bundle everything together, while conda-forge packages the individual pieces.
For this project, cuda-nvcc provides the compiler, cuda-cudart-dev provides the headers and link-time files, and cuda-cudart provides the runtime library. The cuda-version package makes sure that these dependencies stay on the same CUDA release series. Other CUDA libraries follow a similar naming scheme, so cuBLAS and cuFFT have their own development and runtime packages as well.
The driver cannot be installed into a conda environment because it includes a kernel component. Instead, conda represents the driver as a virtual package named __cuda. This package is detected from the host and becomes part of the solver input. If an environment requires a CUDA version that the installed driver cannot support, the solver can reject it before installing the environment.
There is one more useful bit of conda packaging involved here. Development packages can export runtime requirements into packages that are built against them. We add cuda-cudart-dev while compiling, and its run-export adds cuda-cudart to the finished package. This keeps the build dependencies out of the runtime environment without asking us to maintain the same dependency information twice.
With those pieces in place, the model is fairly simple. The host provides the driver, the Pixi environment provides the toolkit, and the resulting conda package records the libraries it needs at runtime.
Building cudabrot
cudabrot is a roughly 150-line CUDA program. Each thread calculates one pixel of the Mandelbrot set, and a smooth escape count is mapped to a color. The host code collects those pixels and displays the resulting image.
The whole C++ project has three files:
cudabrot/
├── pixi.toml          # workspace + package definition, all in one file
├── CMakeLists.txt
└── src/
    └── main.cu
The kernel
The kernel is a regular escape-time implementation. There is nothing specific to Pixi or conda in this code, which is exactly what we want. Packaging should not leak into the application itself.
__global__ void mandelbrot(uchar3 *out, int width, int height, double center_re,
                           double center_im, double step, int max_iter)
{
    int x = blockIdx.x * blockDim.x + threadIdx.x;
    int y = blockIdx.y * blockDim.y + threadIdx.y;
    if (x >= width || y >= height) return;

    double c_re = center_re + (x - width / 2.0) * step;
    double c_im = center_im - (y - height / 2.0) * step;

    double re = 0.0, im = 0.0;
    int it = 0;
    while (re * re + im * im <= 4.0 && it < max_iter) {
        double tmp = re * re - im * im + c_re;
        im = 2.0 * re * im + c_im;
        re = tmp;
        ++it;
    }

    uchar3 color = make_uchar3(0, 0, 0);
    if (it < max_iter) {
        float log_zn = logf(static_cast<float>(re * re + im * im)) * 0.5f;
        float nu = it + 1.0f - log2f(log_zn);
        color = palette(nu / max_iter);  // a smooth cosine palette
    }
    out[y * width + x] = color;
}
The host code reads the terminal dimensions, allocates memory on the GPU, launches the kernel, and copies the resulting pixels back. We use CUDA events to measure the kernel time, render the frame, and finally print a status line with the GPU name and image dimensions.
CMake
CMake has supported CUDA as a first-class language for a long time. We declare C++ and CUDA as the project languages, compile src/main.cu, and install the executable into bin.
cmake_minimum_required(VERSION 3.24)

# Build for all major GPU architectures by default so the resulting conda
# package runs on any reasonably modern NVIDIA GPU. Use "native" while
# iterating locally for faster compiles.
if(NOT DEFINED CMAKE_CUDA_ARCHITECTURES)
  set(CMAKE_CUDA_ARCHITECTURES all-major)
endif()

project(cudabrot LANGUAGES CXX CUDA)

add_executable(cudabrot src/main.cu)
target_compile_features(cudabrot PRIVATE cxx_std_17 cuda_std_17)

install(TARGETS cudabrot RUNTIME DESTINATION bin)
Two lines are worth a closer look. CMAKE_CUDA_ARCHITECTURES=all-major builds code for the major GPU architectures supported by the selected compiler. While working locally, you can replace it with native to compile only for the GPU in your machine.
The install() rule is important because pixi-build-cmake packages the files installed by CMake. The backend sets CMAKE_INSTALL_PREFIX to the conda package prefix and then runs the normal install step. If we forgot the install rule, the build would succeed but the resulting package would not contain cudabrot.
The pixi.toml
Now we get to the part that connects development and packaging. One pixi.toml describes both the workspace we use locally and the package that pixi publish builds.
# ── The workspace: your development environment ────────────────────────────
[workspace]
name = "cudabrot"
channels = ["https://prefix.dev/conda-forge"]
# Declare that this platform provides a CUDA 12 driver (the `__cuda`
# virtual package). This is what lets the solver pick GPU-enabled builds.
platforms = [{ platform = "linux-64", cuda = "12" }, { platform = "linux-64", cuda = "13" }]
preview = ["pixi-build"]

[dependencies]
# Depend on our own package as a source dependency: `pixi run` and
# `pixi install` will (re)build it automatically when sources change.
cudabrot = { path = "." }

[tasks]
render = "cudabrot"
# The classic "seahorse valley" — same binary, deeper zoom.
seahorse = "cudabrot -0.743643887 0.131825904 0.00008 1500"

# Pin which CUDA compiler package the build backend resolves
# `compilers = ["cuda"]` to. On conda-forge, CUDA 12+ compilers live in
# the `cuda-nvcc` packages.
[workspace.build-variants]
cuda_compiler = ["cuda-nvcc"]
cuda_compiler_version = ["12.9"]

# ── The package: what `pixi publish` turns into a .conda file ──────────────
[package]
name = "cudabrot"
version = "0.1.0"

[package.build]
backend = { name = "pixi-build-cmake", version = "0.*", channels = ["https://prefix.dev/conda-forge"] }

[package.build.config]
# Ask the backend for a C++ toolchain *and* the CUDA compiler (nvcc).
compilers = ["cxx", "cuda"]

[package.host-dependencies]
# Headers + libcudart to compile and link against. Its run-export makes the
# resulting package depend on `cuda-cudart` at runtime automatically.
cuda-cudart-dev = "*"
# Pin the CUDA release series for the whole build.
cuda-version = "12.*"
The workspace declares linux-64 environments with CUDA 12 and CUDA 13 drivers. These rich platform declarations add the corresponding __cuda virtual package to the solver. The build itself is pinned to cuda-nvcc 12.9 through workspace.build-variants, while cuda-version = "12.*" keeps the host dependencies on the CUDA 12 series.
Under package.build.config, the line compilers = ["cxx", "cuda"] asks the CMake backend for both toolchains. The compiler request is resolved through the build variants, and the backend activates the resulting compiler environment before starting CMake. We do not need to find nvcc, choose a host compiler, or add either compiler to PATH ourselves.
The other CUDA-specific dependency is cuda-cudart-dev under package.host-dependencies. It provides the files used while compiling and linking. Its run-export then adds the matching runtime dependency to the generated package.
The workspace also depends on cudabrot through a local path dependency. This is what lets Pixi rebuild the package when the source changes and install it directly into the development environment.
Running it
With the project checked out, we can build and run everything with one command:
pixi run render
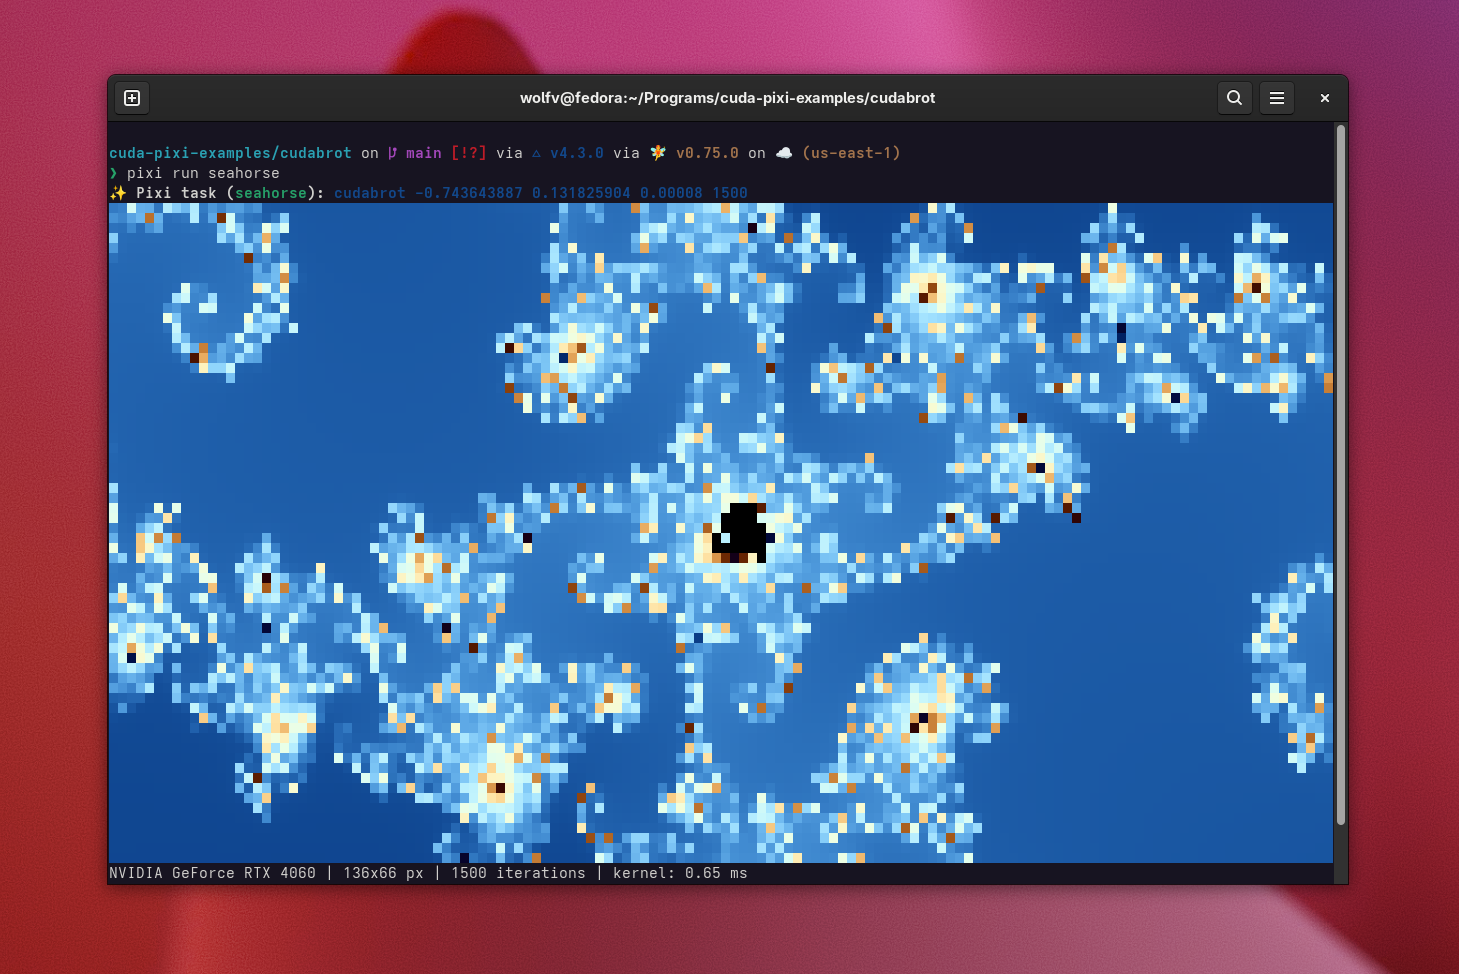
The first run resolves the environment and downloads nvcc, the C++ compiler, CMake, Ninja, and the CUDA development packages. Pixi then builds cudabrot, installs it into the local environment, and starts the program. The rendered image confirms that the compiler, runtime library, and host driver are working together.

There is also a seahorse task with coordinates for a closer look at Seahorse Valley:
pixi run seahorse
Try changing the palette in main.cu and running the task again. Pixi sees the source change and rebuilds the local package before starting it. If you want other checkouts to use the same resolved compiler and dependencies, generate and commit the resulting pixi.lock file.
Packaging it
At this point we have already been developing against the package, so creating the distributable artifact is a small step:
pixi publish --target-dir ./dist
The result is a file named something like cudabrot-0.1.0-<hash>.conda. Its metadata contains the runtime dependency on cuda-cudart, the CUDA constraint derived from the build dependencies, and the executable installed by CMake. The binary is linked for the conda prefix, so it does not rely on a manually configured LD_LIBRARY_PATH.
You can upload the package to any conda channel. For a channel hosted on prefix.dev, the command looks like this:
pixi publish --target-channel https://prefix.dev/api/v1/upload/<channel>
After uploading, the package can be added to a workspace with pixi add cudabrot or installed as a command with pixi global install cudabrot.
What about Python?
Not every CUDA project needs a compiled C++ extension. CuPy can compile CUDA kernels at runtime with NVRTC, which lets us put the kernel source in a Python package and skip nvcc during the package build.
The Python example is called pycudabrot. It creates a cupy.RawKernel, allocates the image array on the GPU, launches the kernel, and copies the pixels back to the host.
import cupy as cp

_KERNEL_SOURCE = r"""
extern "C" __global__
void mandelbrot(unsigned char *rgb, int width, int height,
                double center_re, double center_im, double step, int max_iter)
{
    int x = blockIdx.x * blockDim.x + threadIdx.x;
    int y = blockIdx.y * blockDim.y + threadIdx.y;
    if (x >= width || y >= height) return;

    double c_re = center_re + (x - width / 2.0) * step;
    double c_im = center_im - (y - height / 2.0) * step;

    double re = 0.0, im = 0.0;
    int it = 0;
    while (re * re + im * im <= 4.0 && it < max_iter) {
        double tmp = re * re - im * im + c_re;
        im = 2.0 * re * im + c_im;
        re = tmp;
        ++it;
    }

    float r = 0.0f, g = 0.0f, b = 0.0f;
    if (it < max_iter) {
        // Smooth (fractional) escape count for band-free coloring.
        float log_zn = logf((float)(re * re + im * im)) * 0.5f;
        float t = (it + 1.0f - log2f(log_zn)) / max_iter;
        r = 0.5f + 0.5f * cosf(3.0f + 12.0f * t);
        g = 0.5f + 0.5f * cosf(3.6f + 12.0f * t);
        b = 0.5f + 0.5f * cosf(4.2f + 12.0f * t);
    }
    int i = 3 * (y * width + x);
    rgb[i + 0] = (unsigned char)(255.0f * r);
    rgb[i + 1] = (unsigned char)(255.0f * g);
    rgb[i + 2] = (unsigned char)(255.0f * b);
}
"""

_mandelbrot = cp.RawKernel(_KERNEL_SOURCE, "mandelbrot")


def render(width, height, center=(-0.6, 0.0), span=3.2, max_iter=256):
    """Render the Mandelbrot set on the GPU, returning an (H, W, 3) uint8 array."""
    rgb = cp.empty((height, width, 3), dtype=cp.uint8)
    block = (16, 16)
    grid = (-(-width // block[0]), -(-height // block[1]))
    _mandelbrot(
        grid,
        block,
        (
            rgb,
            cp.int32(width),
            cp.int32(height),
            cp.float64(center[0]),
            cp.float64(center[1]),
            cp.float64(span / width),
            cp.int32(max_iter),
        ),
    )
    return cp.asnumpy(rgb)
The package configuration is shorter because we no longer need compiler packages:
# ── The workspace: your development environment ────────────────────────────
[workspace]
name = "pycudabrot"
channels = ["https://prefix.dev/conda-forge"]
# CuPy needs a CUDA driver at runtime; declare it via the `__cuda`
# virtual package so the solver picks GPU-enabled builds.
platforms = [
    { platform = "linux-64", cuda = "12" }, { platform = "win-64", cuda = "12" },
    { platform = "linux-64", cuda = "13" }, { platform = "win-64", cuda = "13" },
]
preview = ["pixi-build"]

[dependencies]
pycudabrot = { path = "." }

[tasks]
render = "pycudabrot"
seahorse = "pycudabrot -0.743643887 0.131825904 0.00008 1500"

# ── The package: a noarch Python conda package ─────────────────────────────
[package]
name = "pycudabrot"
version = "0.1.0"

[package.build]
backend = { name = "pixi-build-python", version = "0.*", channels = ["https://prefix.dev/conda-forge"] }

[package.host-dependencies]
# The PEP 517 backend that builds the wheel; pixi-build-python turns
# that wheel into a conda package.
hatchling = "*"

[package.run-dependencies]
python = ">=3.10"
cupy = ">=13"
pixi-build-python invokes hatchling through the standard PEP 517 interface, installs the wheel into a conda package, and includes the pycudabrot entry point from pyproject.toml. Since the package contains Python source rather than a compiled extension, it can be built as noarch: python.
The GPU requirements have not disappeared. They have moved to CuPy, whose conda-forge packages describe their CUDA runtime requirements. The solver still compares those requirements with the __cuda value detected from the host.
The development and publishing commands are the same as in the C++ project:
pixi run render
pixi publish --target-dir ./dist
Building without a GPU
One slightly confusing part of CUDA packaging is that compilation does not require a GPU, while solving the environment still expects a __cuda virtual package. A regular CI runner has no NVIDIA driver, so there is nothing for conda to detect.
For builds on such a machine, we can provide the virtual package value explicitly:
CONDA_OVERRIDE_CUDA=12 pixi install
This is enough to solve the environment and compile the project. Running the renderer still requires a machine with a compatible NVIDIA GPU.
Conda can also expose the GPU compute capability through __cuda_arch. Pixi supports this in rich platform declarations when a project needs to select packages for a particular GPU generation:
platforms = [{ platform = "linux-64", cuda = { driver = "12.0", arch = "8.6" } }]
The same workspace can contain CPU-only and CUDA-enabled environments for the same base platform. CUDA compiler packages are available for win-64 as well, although the C++ example in the repository currently targets Linux. A Windows target can use the same package structure with target-specific compiler configuration.
Taking the example further
Once cudabrot runs on your machine, you have a small CUDA project that you can safely take apart and change. Try modifying the kernel, adding another CUDA library, or replacing the renderer with code from one of your own projects. Pixi will keep the compiler and development dependencies in the project while CMake continues to work as usual.
You can also turn the C++ target into a Python extension with nanobind or pybind11, or start from the CuPy example if runtime compilation fits your project better. Libraries such as cuBLAS and cuFFT follow the same dependency pattern as cuda-cudart-dev, so adding them does not require a different packaging workflow.
Clone the companion repository, run pixi run render, and make a small change to the kernel. Once that works, use pixi publish to inspect the package produced from your modified project.
If you run into problems or want to compare notes, you can find us on Discord or send us an email.